所需环境
树莓派一个
路由器
境外vps shadowsocks-libev 环境
原理
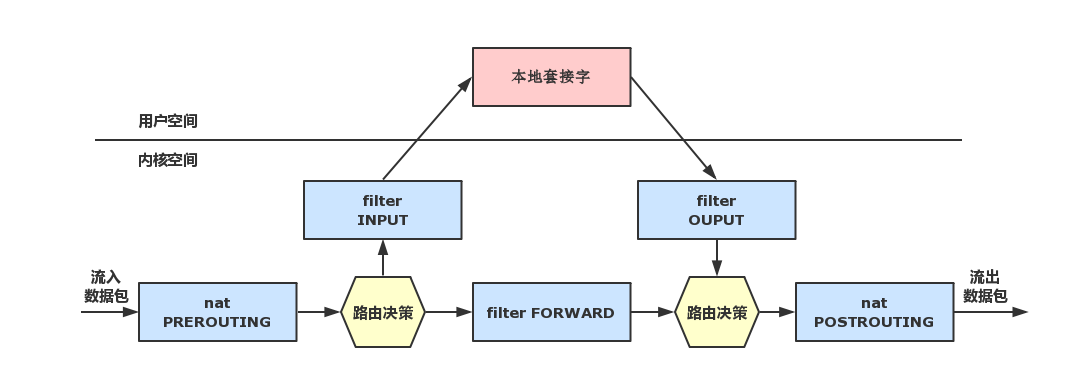
数据发起—-路由器—dns(树莓派)–iptables局域网放行–dnsmasq查询真实并缓存–局域网iptables放行—-路由器—网关(树莓派)—iptables过滤国内直接放行,国外数据打包socks5走本地1080端口外出。
A。安装shadowsocks
git clone https://github.com/shadowsocks/shadowsocks-libev.git
cd shadowsocks-libev
安装编译环境
sudo apt-get install build-essential autoconf libtool libssl-dev gawk debhelper dh-systemd init-system-helpers pkg-config
树莓派这里会出问题,没法安装dh-systemd这里直接编译安装
./configure–prefix=/usr/local/shadowsocks
make && make install
ln -s /usr/local/shadowsocks/bin/ss-redir ss-redir
生成deb包
dpkg-buildpackage -us -uc -i
安装刚生成的deb包,在github主页上有介绍。这里是debian安装的过程编译好的deb,及其他配置文件
sudo dpkg -i shadowsocks-libev*.deb
使用ss-redir -c /etc/redir.json 这里local_adress必须写0.0.0.0,127.0.0.1会出问题
{
“server”:”服务器地址”,
“server_port”:服务器开放的端口,
“local_address”:”0.0.0.0″,
“local_port”:本地端口,
“password”:”密码”,
“timeout”:600,
“method”:”aes-256-cfb”,
“fast_open”:false
}
B。iptables及转发
#vim /etc/sysctl.conf

net.ipv4.ip_forward=1
linux做网关要开启数据转发#sysctl -p

编写2个脚本一个启动用一个停止用
启动的iptables.sh 还有flash.sh 清理用的iptables
简单的
#!/bin/bash
# Create new chain
iptables -t nat -N SHADOWSOCKS
iptables -t nat -A PREROUTING -p tcp -j SHADOWSOCKS
# Ignore your shadowsocks server’s addresses
# It’s very IMPORTANT, just be careful.
iptables -t nat -A SHADOWSOCKS -d 服务器ip地址 -j RETURN
# 这一步非常重要!到服务端的出口数据不要再进行重定向,否则进入死循环
#去除内网地址
iptables -t nat -A SHADOWSOCKS -d 0.0.0.0 -j RETURN
iptables -t nat -A SHADOWSOCKS -d 127.0.0.1 -j RETURN
iptables -t nat -A SHADOWSOCKS -d 192.168.0.0/16 -j RETURN

iptables -t nat -A SHADOWSOCKS -d 8.8.0.0/16 -j RETURN
iptables -t nat -A SHADOWSOCKS -d 0.0.0.0/8 -j RETURN
iptables -t nat -A SHADOWSOCKS -d 10.0.0.0/8 -j RETURN
iptables -t nat -A SHADOWSOCKS -d 127.0.0.0/8 -j RETURN
iptables -t nat -A SHADOWSOCKS -d 169.254.0.0/16 -j RETURN
iptables -t nat -A SHADOWSOCKS -d 172.16.0.0/12 -j RETURN
iptables -t nat -A SHADOWSOCKS -d 192.168.0.0/16 -j RETURN
iptables -t nat -A SHADOWSOCKS -d 224.0.0.0/4 -j RETURN
iptables -t nat -A SHADOWSOCKS -d 240.0.0.0/4 -j RETURN
iptables -t nat -A SHADOWSOCKS -d 0.0.0.0/254.0.0.0 -j RETURN

#还可以加如国内ip段参见 https://gist.github.com/wen-long/8644507
# Anything else should be redirected to shadowsocks’s local port
iptables -t nat -A SHADOWSOCKS -p tcp -j REDIRECT –to-ports 1080

# Apply the rules
#iptables -t nat -A OUTPUT -p tcp -j SHADOWSOCKS
# 对于本机全局代理必须是加入到OUTPUT链中,上面这句可以不加,至此脚本结束
清理脚本 flash.sh 因为debian下,iptables不是服务。没有启动停止的概念是实时生效的,清理完规则相当于其实停止了。iptables-save > qqq 恢复 iptables-restore < qqq
#!/bin/bash
iptables -F
iptables -X
iptables -t nat -F
iptables -t nat -X
iptables -t mangle -F
iptables -t mangle -X
iptables -P INPUT ACCEPT
iptables -P OUTPUT ACCEPT
iptables -P FORWARD ACCEPT
C.dnsmasq
apt-get install network-manger dnsmasq
启用本地dns
如果使用了networkmanger要这样设置启用dnsmasq
Set this in /etc/NetworkManager/NetworkManager.conf:
[main]

dns=dnsmasq

如果没有那么

修改默认的dns配置文件

/etc/reslov.conf

nameserver 127.0.0.1
修改/etc/reslov.dnsmasq(需自己创建)
nameserver 8.8.8.8
nameserver 8.8.4.4
编辑/etc/dnsmasq.conf
在最后加入
conf-dir=/etc/dnsmasq.d/,*.conf
listen-address=127.0.0.1,192.168.1.104
bind-interfaces
cache-size=100000
domain-needed
resolv-file=/etc/resolv.dnsmasq
其中cache缓存10000条
resolv-file=/etc/resolv.dnsmasq 上游dns地址
listen-address=127.0.0.1,192.168.1.104 为局域网及本机提供dns服务
conf-dir=/etc/dnsmasq.d/,*.conf 接受目录下的所有配置文件
/etc/dnsmasq.d/t.conf内容,意思是这些地址走208.67.222.222的5353端口查询
#Google and Youtube
server=/.google.com/208.67.222.222#5353
server=/.google.com.hk/208.67.222.222#5353
server=/.gstatic.com/208.67.222.222#5353
server=/.ggpht.com/208.67.222.222#5353
server=/.googleusercontent.com/208.67.222.222#5353
server=/.appspot.com/208.67.222.222#5353
server=/.googlecode.com/208.67.222.222#5353
server=/.googleapis.com/208.67.222.222#5353
server=/.gmail.com/208.67.222.222#5353
server=/.google-analytics.com/208.67.222.222#535
server=/.youtube.com/208.67.222.222#5353
server=/.googlevideo.com/208.67.222.222#5353
server=/.youtube-nocookie.com/208.67.222.222#5353
server=/.ytimg.com/208.67.222.222#5353
server=/.blogspot.com/208.67.222.222#5353
server=/.blogger.com/208.67.222.222#5353

#FaceBook
server=/.facebook.com/208.67.222.222#5353
server=/.thefacebook.com/208.67.222.222#5353
server=/.facebook.net/208.67.222.222#5353
server=/.fbcdn.net/208.67.222.222#5353
server=/.akamaihd.net/208.67.222.222#5353

#Twitter
server=/.twitter.com/208.67.222.222#5353
server=/.t.co/208.67.222.222#5353
server=/.bitly.com/208.67.222.222#5353
server=/.twimg.com/208.67.222.222#5353
server=/.tinypic.com/208.67.222.222#5353
server=/.yfrog.com/208.67.222.222#5353

server=/gist.github.com/208.67.222.222#5353
server=/.chrome.com/208.67.222.222#5353
server=/.android.com/208.67.222.222#5353
server=/.appspot.com/208.67.222.222#5353
server=/.goo.gl/208.67.222.222#5353
server=/.feedburner.com/208.67.222.222#5353

update.rc 来开机启动dnsmasq
—————————————————————————————————————————–
扩展知识
启动守护进程
设置为开机启动:
systemctl enable dnsmasq
立即启动 dnsmashq:
systemctl start dnsmasq
查看dnsmasq是否启动正常,查看系统日志:
journalctl -u dnsmasq
—————————————————————————————————————————–
D。使用
systemctl enable dnsmasq

systemctl start dnsmasq

ss-redir -c /etc/redir.json

./iptables.sh
前提,设置静态ip
auto eth0
allow-hotplug eth0
iface eth0 inet static
address 192.168.1.104
netmask 255.255.255.0
gateway 192.168.1.1
路由器修改dncp里面的dns为192.168.1.104.网关也是192.168.1.104